![]()
Modificando la imagen
En el post anterior vimos cómo descargar una imagen de Tomcat y crear un contenedor desde ella. De ese modo pudimos tener instalado un servidor de aplicaciones web Tomcat. En la imagen base no está configurado el acceso a la consola de administración de Tomcat. Tomcat usa un fichero xml en el que se configuran los usuarios y los roles de acceso a Tomcat. Este fichero se llama tomcat-users.xml y se encuentra en el directorio ${TOMCAT_DIR}/conf. El contenido del fichero en la imagen base es:
docker run -it tomcat /bin/bash
root@7ec07222f200:/usr/local/tomcat# cat conf/tomcat-users.xml
<?xml version='1.0' encoding='utf-8'?>
<!-- Licensed to the Apache Software Foundation (ASF) under one or more contributor license agreements. See the NOTICE file distributed with this work for additional information regarding copyright ownership. The ASF licenses this file to You under the Apache License, Version 2.0 (the "License"); you may not use this file except in compliance with the License. You may obtain a copy of the License at http://www.apache.org/licenses/LICENSE-2.0 Unless required by applicable law or agreed to in writing, software distributed under the License is distributed on an "AS IS" BASIS, WITHOUT WARRANTIES OR CONDITIONS OF ANY KIND, either express or implied. See the License for the specific language governing permissions and limitations under the License. -->
<tomcat-users xmlns="http://tomcat.apache.org/xml" xmlns:xsi="http://www.w3.org/2001/XMLSchema-instance" xsi:schemaLocation="http://tomcat.apache.org/xml tomcat-users.xsd" version="1.0">
<!-- NOTE: By default, no user is included in the "manager-gui" role required to operate the "/manager/html" web application. If you wish to use this app, you must define such a user - the username and password are arbitrary. It is strongly recommended that you do NOT use one of the users in the commented out section below since they are intended for use with the examples web application. -->
<!--
 NOTE: The sample user and role entries below are intended for use with the
 examples web application. They are wrapped in a comment and thus are ignored
 when reading this file. If you wish to configure these users for use with the
 examples web application, do not forget to remove the <!.. ..> that surrounds
 them. You will also need to set the passwords to something appropriate.
-->
<!--
 <role rolename="tomcat"/>
 <role rolename="role1"/>
 <user username="tomcat" password="<must-be-changed>" roles="tomcat"/>
 <user username="both" password="<must-be-changed>" roles="tomcat,role1"/>
 <user username="role1" password="<must-be-changed>" roles="role1"/>
-->
</tomcat-users>
Es un punto de partida, con ejemplos, pero como se puede ver no tiene ningún usuario configurado. Si tratamos de modificar ese fichero, sólo estarán disponibles los cambios mientras el contenedor esté en ejecución.
Para poder hacer persistentes los cambios necesitaremos o bien hacer un commit del contenedor en ejecución, algo que haremos ahora, o bien crear una imagen personalizada, que lo veremos más tarde.
Haciendo commit
Si accedemos a un contenedor en ejecución y realizamos cambios dentro del contenedor, los cambios se perderían cuando paremos el contenedor. Una forma de salvar los cambios es mediante un commit del contenedor, que lo que hace es convertir el contenedor en una capa de imagen, por encima de la imagen base.
$ docker run -it tomcat /bin/bash
root@7ec07222f200:/usr/local/tomcat# sed -i '/\/tomcat-users/i \
<role rolename="manager-gui"\/> \
<user username="admin" password="admin" roles="manager-gui"\/>' conf/tomcat-users.xml
## FROM ANOTHER TERMINAL
$ docker ps ## My container is named determined_heisenberg
$ docker commit --pause --author "Jose David Martin <j.david.nieto@gmail.com>" --message "Adding admin user to Tomcat" --change 'CMD ["catalina.sh", "run"]' --change 'EXPOSE 8080' determined_heisenberg my_images/tomcat-admin
sha256:0b293a53dd8242a5f4e1d6c4390c34a440e2691707954eee9623429837fa263b
$ docker images
REPOSITORY TAG IMAGE ID CREATED SIZE
my_images/tomcat-admin latest 0b293a53dd82 4 seconds ago 355.4 MB
docker.io/tomcat latest ebb17717bed4 3 days ago 355.4 MB
Acerca de las opciones: author especifica el autor de la nueva imagen. message una descripción corta de lo que hace la nueva capa de imagen. change añade las opciones del Dockerfile para la creación de la imagen.
Como se puede apreciar, hemos creado nuestra imagen personalizada partiendo de una modificación en el contenedor pero, ¿realmente ha funcionado? Vayamos a verlo.
$ docker run -p 8080:8080 -d --name tomcat_test my_images/tomcat-admin
$ docker ps -a
CONTAINER ID IMAGE COMMAND CREATED STATUS PORTS NAMES
1b06f5463f23 my_images/tomcat-admin "catalina.sh run" 3 minutes ago Up 3 minutes 0.0.0.0:8080->8080/tcp tomcat_test
Ahora es tiempo de saber si ha funcionado. En esta primera ejecución intentaré acceder a la consola sin hacer login:
$ curl -Lv localhost:8080/manager|head
 % Total % Received % Xferd Average Speed Time Time Time Current
 Dload Upload Total Spent Left Speed
 0 0 0 0 0 0 0 0 --:--:-- --:--:-- --:--:-- 0* Trying 127.0.0.1...
* Connected to localhost (127.0.0.1) port 8080 (#0)
> GET /manager HTTP/1.1
> Host: localhost:8080
> User-Agent: curl/7.47.1
> Accept: */*
>
< HTTP/1.1 302 Found
< Server: Apache-Coyote/1.1
< Location: /manager/
< Transfer-Encoding: chunked
< Date: Fri, 04 Nov 2016 10:44:14 GMT
< * Ignoring the response-body { [5 bytes data] 0 0 0 0 0 0 0 0 --:--:-- --:--:-- --:--:-- 0 * Connection #0 to host localhost left intact * Issue another request to this URL: 'http://localhost:8080/manager/' * Found bundle for host localhost: 0x557ed5142220 [can pipeline] * Re-using existing connection! (#0) with host localhost * Connected to localhost (127.0.0.1) port 8080 (#0) > GET /manager/ HTTP/1.1
> Host: localhost:8080
> User-Agent: curl/7.47.1
> Accept: */*
>
< HTTP/1.1 302 Found
< Server: Apache-Coyote/1.1
< Location: /manager/html
< Content-Type: text/html
< Content-Length: 0
< Date: Fri, 04 Nov 2016 10:44:14 GMT
< 0 0 0 0 0 0 0 0 --:--:-- --:--:-- --:--:-- 0 * Connection #0 to host localhost left intact * Issue another request to this URL: 'http://localhost:8080/manager/html' * Found bundle for host localhost: 0x557ed5142220 [can pipeline] * Re-using existing connection! (#0) with host localhost * Connected to localhost (127.0.0.1) port 8080 (#0) > GET /manager/html HTTP/1.1
> Host: localhost:8080
> User-Agent: curl/7.47.1
> Accept: */*
>
< HTTP/1.1 401 Unauthorized
< Server: Apache-Coyote/1.1
< Cache-Control: private
< Expires: Thu, 01 Jan 1970 00:00:00 UTC
< WWW-Authenticate: Basic realm="Tomcat Manager Application"
< Content-Type: text/html;charset=ISO-8859-1
< Content-Length: 2473
< Date: Fri, 04 Nov 2016 10:44:14 GMT
Y ahora con login:
curl -Lv --user admin:admin localhost:8080/manager|head
 % Total % Received % Xferd Average Speed Time Time Time Current
 Dload Upload Total Spent Left Speed
 0 0 0 0 0 0 0 0 --:--:-- --:--:-- --:--:-- 0* Trying 127.0.0.1...
* Connected to localhost (127.0.0.1) port 8080 (#0)
* Server auth using Basic with user 'admin'
> GET /manager HTTP/1.1
> Host: localhost:8080
> Authorization: Basic YWRtaW46YWRtaW4=
> User-Agent: curl/7.47.1
> Accept: */*
>
< HTTP/1.1 302 Found
< Server: Apache-Coyote/1.1
< Location: /manager/
< Transfer-Encoding: chunked
< Date: Fri, 04 Nov 2016 10:46:00 GMT
< * Ignoring the response-body { [5 bytes data] 0 0 0 0 0 0 0 0 --:--:-- --:--:-- --:--:-- 0 * Connection #0 to host localhost left intact * Issue another request to this URL: 'http://localhost:8080/manager/' * Found bundle for host localhost: 0x56529cc07280 [can pipeline] * Re-using existing connection! (#0) with host localhost * Connected to localhost (127.0.0.1) port 8080 (#0) * Server auth using Basic with user 'admin' > GET /manager/ HTTP/1.1
> Host: localhost:8080
> Authorization: Basic YWRtaW46YWRtaW4=
> User-Agent: curl/7.47.1
> Accept: */*
>
< HTTP/1.1 302 Found
< Server: Apache-Coyote/1.1
< Location: /manager/html
< Content-Type: text/html
< Content-Length: 0
< Date: Fri, 04 Nov 2016 10:46:00 GMT
< 0 0 0 0 0 0 0 0 --:--:-- --:--:-- --:--:-- 0 * Connection #0 to host localhost left intact * Issue another request to this URL: 'http://localhost:8080/manager/html' * Found bundle for host localhost: 0x56529cc07280 [can pipeline] * Re-using existing connection! (#0) with host localhost * Connected to localhost (127.0.0.1) port 8080 (#0) * Server auth using Basic with user 'admin' > GET /manager/html HTTP/1.1
> Host: localhost:8080
> Authorization: Basic YWRtaW46YWRtaW4=
> User-Agent: curl/7.47.1
> Accept: */*
>
< HTTP/1.1 200 OK
< Server: Apache-Coyote/1.1
< Cache-Control: private
< Expires: Thu, 01 Jan 1970 00:00:00 UTC
< Set-Cookie: JSESSIONID=EBB76CFD207E9EA87ABE3E2C3BA9402B; Path=/manager; HttpOnly
< Content-Type: text/html;charset=utf-8
< Transfer-Encoding: chunked
< Date: Fri, 04 Nov 2016 10:46:00 GMT
Dockerfile
Otra manera, algo más adecuada, para crear imágenes personalizadas es utilizar un fichero que definirá cómo ha de crearse la imagen. Este fichero es llamado Dockerfile, y contiene una serie de instrucciones para configurar el proceso de creación de imagen. De hecho, si queremos añadir el código de nuestra aplicación, esta es la manera adecuada, ya que es posible que la imagen base no disponga de las herramientas necesarias para obtener nuestra aplicación tales como git, wget, curl, etc.
El fichero Dockerfile se puede crear con múltiples instrucciones, aunque yo voy a usar las más básicas, aunque aquí podéis encontrar la referencia completa.
Directivas:
- FROM: aquí debemos indicar la imagen base a emplear. Puede ser una imagen creada por nosotros en nuestro repositorio local, o utilizar alguna del repositorio público de docker.
- MAINTAINER: el autor de la nueva imagen con formato “NOMBRE <EMAIL>”
- RUN: le indica un comando que se ejecutará en un contendor intermedio para crear nuestra imagen final. Podemos incluir la directiva tantas veces como queramos, pero eso creará múltiples capas que aumentarán de manera considerable el tamaño de nuestra imagen final. Por ello es aconsejado encadenar múltiples comandos en una instrucción separándolos con &&
- ADD / COPY: la función de estas dos directivas es añadir ficheros externos dentro de nuestra imagen. ADD es capaz de obtener los ficheros desde servidores web, mientras que COPY sólo incluye ficheros que se encuentren en el host desde el que estamos creando la imagen. El comportamiento de ADD con un fichero comprimido es descomprimirlo en la ruta que le hayamos indicado, mientras que COPY copia el fichero comprimido tal cual. A nuestra elección queda.
- ENV: permite crear variables de entorno para nuestra imagen. Está basado en una <CLAVE> <VALOR>
- EXPOSE: indica los puertos que la imagen ofrece al exterior
- CMD: el comando que se ejecutará cuando el contenedor arranque. Su formato es [“comando”, “argumento 1”, “argumento 2”, …]. Cualquier comando que indiquemos al final de la instrucción docker run sustituirá a lo que esté definido en CMD
Como ejemplo vamos a crear una imagen con acceso a la consola web, partiendo de la imagen base, pero esta vez con Dockerfile. Crearemos una estructura de projecto tal que así:
my_tomcat/
├── Dockerfile
└── files/
 └── tomcat-users.xml

1 directory, 2 files
El fichero tomcat-users.xml contendrá el esquema <tomcat-users> incluyendo las directivas para añadir nuestro usuario admin, tal como vimos en el paso del commit. El fichero Dockerfile quedará así:
$ cat my_tomcat/Dockerfile
FROM tomcat
MAINTAINER David Martín david@dmartin.es

COPY files/tomcat-users.xml /usr/local/tomcat/conf/tomcat-users.xml
El siguiente paso es crear la imagen. Para ello ejecutaremos el comando docker build con el nombre de la imagen final, y algunas opciones como –rm que borrará las imagenes intermedias. El último argumento será la ruta hacia el directorio que contiene el Dockerfile. Por tanto:
$ docker build -t new_repo/tomcat-test --rm my_tomcat/
Sending build context to Docker daemon 5.632 kB
Step 1 : FROM tomcat
 ---> ebb17717bed4
Step 2 : MAINTAINER David Martín david@dmartin.es
 ---> Running in bd1f820dd082
 ---> 52507e28c4bd
Removing intermediate container bd1f820dd082
Step 3 : COPY files/tomcat-users.xml /usr/local/tomcat/conf/tomcat-users.xml
 ---> 5cb28500a2f4
Removing intermediate container 389c2dfbd73b
Successfully built 5cb28500a2f4

$ docker images
REPOSITORY TAG IMAGE ID CREATED SIZE
new_repo/tomcat-test latest 5cb28500a2f4 31 seconds ago 355.4 MB
my_images/tomcat-admin latest 3fc1a273c055 2 hours ago 355.4 MB
docker.io/tomcat latest ebb17717bed4 3 days ago 355.4 MB
Ahora tenemos dos imágenes, la del commit en el repositorio my_images y la del Dockerfile en el repositorio new_repo.
Nuestro código
El concepto de añadir el código de nuestra aplicación es el mismo que he empleado para habilitar el acceso a la consola de gestión.
Vamos a emplear la imagen ya creada, y le añadiremos una página JSP, en una aplicación que llamaré my-app. El proyecto queda así:
$ tree -FAC Docker-tutorial/
Docker-tutorial/
├── Dockerfile
└── my-app/
 └── index.jsp
Y el Dockerfile así:
cat Docker-tutorial/Dockerfile
FROM new_repo/tomcat-test
MAINTAINER David Martín david@dmartin.es

COPY my-app /usr/local/tomcat/webapps/my-app
Es el momento de construir la imagen y probarlo
$ docker build -t my-app --rm Docker-tutorial
Sending build context to Docker daemon 3.584 kB
Step 1 : FROM new_repo/tomcat-test
 ---> 5cb28500a2f4
Step 2 : MAINTAINER David Martín david@dmartin.es
 ---> Running in f655f489f67a
 ---> 229f530d4aa9
Removing intermediate container f655f489f67a
Step 3 : COPY my-app /usr/local/tomcat/webapps/my-app
 ---> 98ff1813bc26
Removing intermediate container 4d52df8d94c4
Successfully built 98ff1813bc26

$ docker run -d -p 8080:8080 --name my-app my-app
9ad1603e580b25685e9355e49cfca152be8c2eafa95af54d06c94d0651bee959

$ docker ps
CONTAINER ID IMAGE COMMAND CREATED STATUS PORTS NAMES
300e6db90e8c my-app "catalina.sh run" 30 seconds ago Up 28 seconds 0.0.0.0:8080->8080/tcp my-app


$ curl -L localhost:8080/my-app
<html>
<head><title>First JSP</title></head>
<body>


<h2>Well, life goes on ... </h2>

(0.884289073863237)


 <a href="/my-app/">
<h3>Try Again</h3>

</a>
</body>
</html>

$ curl -L localhost:8080/my-app
<html>
<head><title>First JSP</title></head>
<body>


<h2>Well, life goes on ... </h2>

(0.915383534198516)


 <a href="/my-app/">
<h3>Try Again</h3>

</a>
</body>
</html>
Como se puede ver, está funionando bien. Por cierto, el fichero index.jsp es tal que así:
$ cat Docker-tutorial/my-app/index.jsp
<html>
<head><title>First JSP</title></head>
<body>
 <% double num = Math.random(); if (num > 0.95) {
 %>

<h2>You'll have a luck day!</h2>

(<%= num %>)

 <% } else { %>

<h2>Well, life goes on ... </h2>

(<%= num %>)

 <% } %>
 <a href="<%= request.getRequestURI() %>">
<h3>Try Again</h3>

</a>
</body>
</html>
Llevémoslo al siguiente nivel…
Usando GIT para crear nuestras imágenes
Docker nos ofrece un repositorio público donde podemos subir nuestras imágenes. Para ello debemos registrarnos en https://hub.docker.com. Una vez tengamos cuenta, vamos a subir nuestra imagen new_repo/tomcat-test. Antes de hacerlo, deberemos modificar un poco el nombre de la imágen para que se ajuste a nuestro nuevo repositorio, que en mi caso es dmartin, y usaremos docker tag para ello.
$ docker tag new_repo/tomcat-test docker.io/dmartin/tomcat-test

$ docker rmi new_repo/tomcat-test
Untagged: new_repo/tomcat-test:latest

$ docker images
REPOSITORY TAG IMAGE ID CREATED SIZE
my-app latest 98ff1813bc26 24 minutes ago 355.4 MB
docker.io/dmartin/tomcat-test latest 5cb28500a2f4 About an hour ago 355.4 MB
my_images/tomcat-admin latest 3fc1a273c055 3 hours ago 355.4 MB
docker.io/tomcat latest ebb17717bed4 3 days ago 355.4 MB
Ahora, es necesario autenticarnos desde la línea de comandos, para poder subir nuestra imagen:
$ docker login
Username: dmartin
Password: <my-password>
Email: david@dmartin.es
WARNING: login credentials saved in /home/dmartin/.docker/config.json
Login Succeeded

$ docker push docker.io/dmartin/tomcat-test
The push refers to a repository [docker.io/dmartin/tomcat-test]
cd97edd587f2: Pushed
6d87035edd36: Mounted from library/tomcat
8da55bea02cf: Mounted from library/tomcat
0a4296b74c9b: Mounted from library/tomcat
abdc61dac742: Mounted from library/tomcat
5d330cd8c000: Mounted from library/tomcat
198154638bb4: Mounted from library/tomcat
51d13a3b182e: Mounted from library/tomcat
94601555adaf: Mounted from library/tomcat
0de9d866d419: Mounted from library/tomcat
149636c85012: Mounted from library/tomcat
f96222d75c55: Mounted from library/tomcat
latest: digest: sha256:759a5c11badf9e2696e4cde096bd855cb47bfd9cf363d934b50c843eb6304507 size: 2811
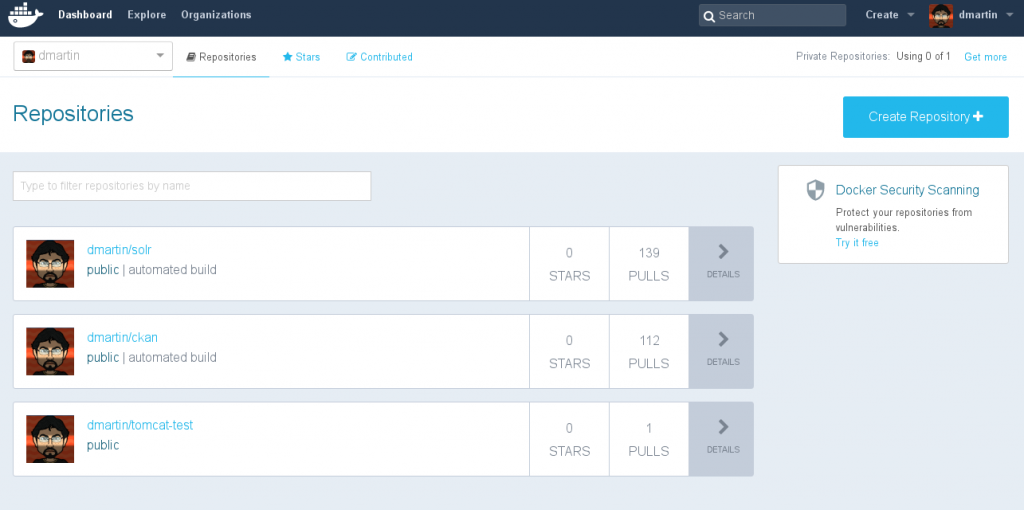
Si vamos a la web de Docker, veremos nuestra imagen ya subida

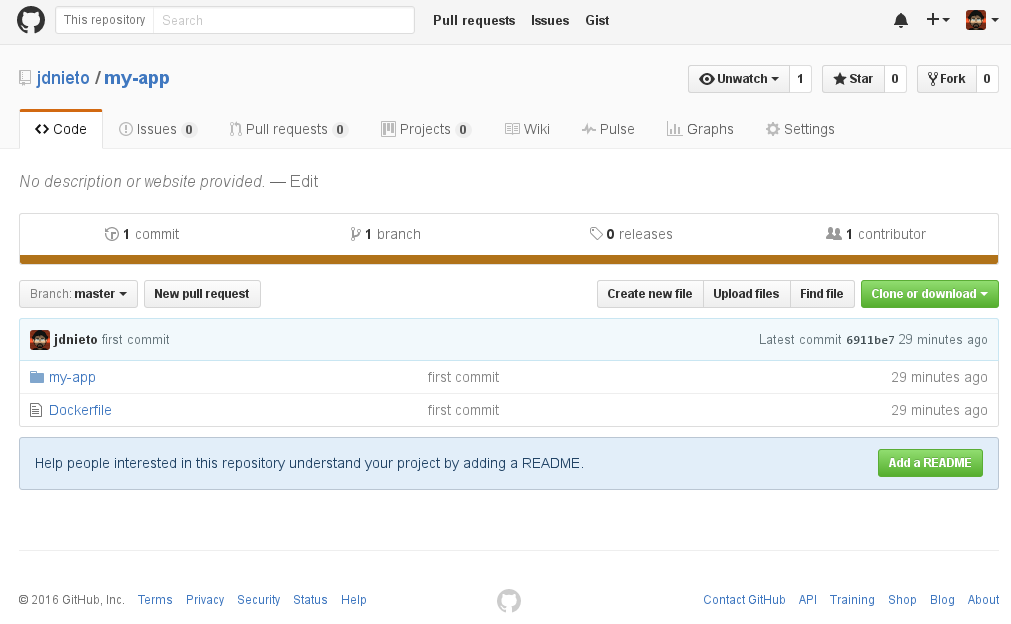
Siguiente paso, nuestro proyecto en git. Si no tienes cuenta en github, es buen momento de hacerte con una.
Con la cuenta de github, y nuestro proyecto ya creado, Docker nos permite enlazar un servicio con la cuenta de github. Esto permitirá que, por defecto, cada vez que hagamos un commit en nuestro repositorio, se reconstruirá la imagen con los cambios realizados.
Voy a utilizar el mismo proyecto my-app y crear el repositorio en github.

Ahora en nuestra cuenta de Docker > Profile > Settings > Linked Accounts & Services podremos enlazar con nuestra cuenta de github de dos maneras distintas: Public and Private es el modo recomendado que permite crear las conexiones, Limited con acceso limitado de sólo lectura. Usaremos el recomendado. Se abrirá una pestaña de github para autorizar el acceso.
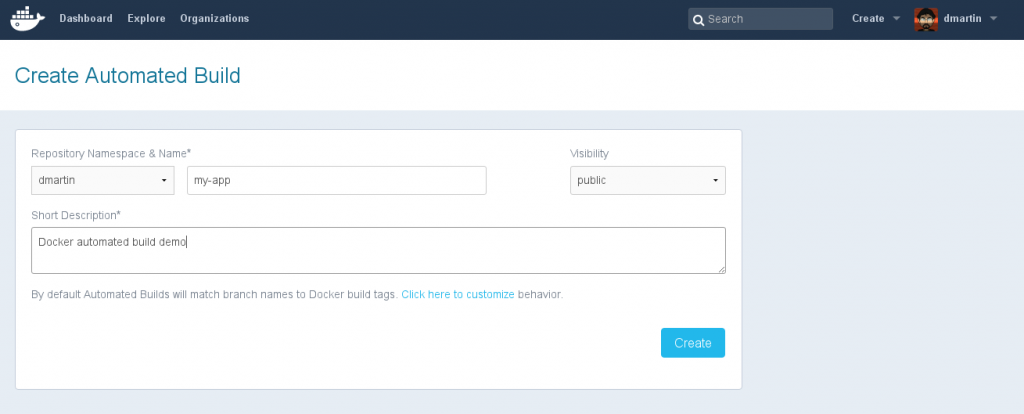
De nuevo en Docker veremos arriba a la derecha, junto a nuestro perfil, un acceso a Create > Automated Build. Al pinchar en el nos permitirá seleccionar nuestra cuenta de github y después seleccionar el repositorio, en mi caso my-app en la rama master, acto seguido añadiremos una descripción de nuestro proceso automático.

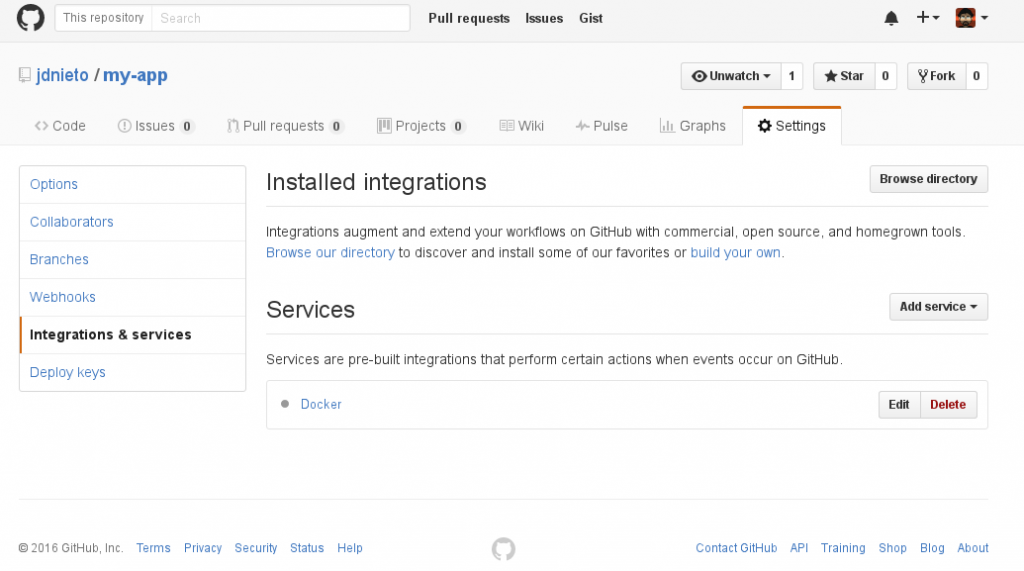
Si ahora vamos a github > my-app > Settings > Integration & Services podremos ver el enlace con nuestro servicio de Docker.

Recordad que en la raíz de nuestro proyecto en github debe existir un Dockerfile con las instrucciones para construir la imagen.
Ahora voy a añadir un nuevo fichero JSP a nuestro proyecto.
$ sed -i 's/new_repo/docker.io\/dmartin/' Dockerfile
$ cat > my-app/date.jsp <<EOF
line -|<%@ page language="java" contentType="text/html; charset=US-ASCII"
line -| pageEncoding="US-ASCII"%>
line -|<!DOCTYPE html PUBLIC "-//W3C//DTD HTML 4.01 Transitional//EN" "http://www.w3.org/TR/html4/loose.dtd">
line -|<html>
line -|<head>
line -|<meta http-equiv="Content-Type" content="text/html; charset=US-ASCII">
line -|<title>First JSP</title>
line -|</head>
line -|<%@ page import="java.util.Date" %>
line -|<body>
line -|<h3>Hi David</h3><br>
line -|<strong>Current Time is</strong>: <%=new Date() %>
line -|
line -|</body>
line -|</html>
line -|EOF
$ git add Dockerfile my-app/date.jsp
$ git commit -m "added date.jsp to show the date"
$ git push
Y ya sólo queda esperar que la imagen se construya. En ocasiones puede tardar bastante, ya que se computa en los servidores de Docker, por lo que si hay mucha gente creando imágenes simultáneamente podría tardar bastante. Al finalizar veremos esto

Tiempo ahora de usar nuestra nueva imagen, y probarlo.
$ docker pull docker.io/dmartin/my-app
Using default tag: latest
Trying to pull repository docker.io/dmartin/my-app ...
latest: Pulling from docker.io/dmartin/my-app

43c265008fae: Already exists
af36d2c7a148: Already exists
2b7b4d10e1c1: Already exists
35dfd23791b5: Already exists
fa0aca12f0dd: Already exists
6e3e424fb5e8: Already exists
3134459e064c: Already exists
3189bffb00a1: Already exists
bac57527e43a: Already exists
3b033f96b6a0: Already exists
088aa8eca2bc: Already exists
91a67baee401: Already exists
13ab5329bd64: Pull complete
Digest: sha256:91960f8626e217bfba3fe903c2b3ff4e43e2c58c779cda4cdfed87acb318b098
Status: Downloaded newer image for docker.io/dmartin/my-app:latest

$ docker run -d -p 8080:8080 --name docker_built docker.io/dmartin/my-app:latest
7e6c2a4be6db3f7e319c24d01285f4171e0d85252a10917b70b3f88965d18d10

$ docker ps
CONTAINER ID IMAGE COMMAND CREATED STATUS PORTS NAMES
7e6c2a4be6db docker.io/dmartin/my-app:latest "catalina.sh run" 5 seconds ago Up 3 seconds 0.0.0.0:8080->8080/tcp docker_built

$ curl -L localhost:8080/my-app/date.jsp

<!DOCTYPE html PUBLIC "-//W3C//DTD HTML 4.01 Transitional//EN" "http://www.w3.org/TR/html4/loose.dtd">
<html>
<head>
<meta http-equiv="Content-Type" content="text/html; charset=US-ASCII">
<title>First JSP</title>
</head>

<body>
<h3>Hi David</h3><br>
<strong>Current Time is</strong>: Fri Nov 04 15:36:21 UTC 2016

</body>
</html>
Y hasta aquí nuestro tutorial de introducción a Docker. Hay mucho, pero que mucho más que Docker puede ofrecer, pero te dejo que lo descubras por ti mismo. Nos vemos.
