![]()
Modifying the image
The last post showed how to download a Tomcat docker image and to deploy a container from it. We were able to have a Tomcat web application server, but we could not access the manager console because it was not configured on the image. Tomcat uses a xml file to configure users and roles to access the server, is named tomcat-users.xml under the directory ${TOMCAT_DIR}/conf. The base image file content is:
docker run -it tomcat /bin/bash
root@7ec07222f200:/usr/local/tomcat# cat conf/tomcat-users.xml
<?xml version='1.0' encoding='utf-8'?>
<!-- Licensed to the Apache Software Foundation (ASF) under one or more contributor license agreements. See the NOTICE file distributed with this work for additional information regarding copyright ownership. The ASF licenses this file to You under the Apache License, Version 2.0 (the "License"); you may not use this file except in compliance with the License. You may obtain a copy of the License at http://www.apache.org/licenses/LICENSE-2.0 Unless required by applicable law or agreed to in writing, software distributed under the License is distributed on an "AS IS" BASIS, WITHOUT WARRANTIES OR CONDITIONS OF ANY KIND, either express or implied. See the License for the specific language governing permissions and limitations under the License. -->
<tomcat-users xmlns="http://tomcat.apache.org/xml" xmlns:xsi="http://www.w3.org/2001/XMLSchema-instance" xsi:schemaLocation="http://tomcat.apache.org/xml tomcat-users.xsd" version="1.0">
<!-- NOTE: By default, no user is included in the "manager-gui" role required to operate the "/manager/html" web application. If you wish to use this app, you must define such a user - the username and password are arbitrary. It is strongly recommended that you do NOT use one of the users in the commented out section below since they are intended for use with the examples web application. -->
<!--
 NOTE: The sample user and role entries below are intended for use with the
 examples web application. They are wrapped in a comment and thus are ignored
 when reading this file. If you wish to configure these users for use with the
 examples web application, do not forget to remove the <!.. ..> that surrounds
 them. You will also need to set the passwords to something appropriate.
-->
<!--
 <role rolename="tomcat"/>
 <role rolename="role1"/>
 <user username="tomcat" password="<must-be-changed>" roles="tomcat"/>
 <user username="both" password="<must-be-changed>" roles="tomcat,role1"/>
 <user username="role1" password="<must-be-changed>" roles="role1"/>
-->
</tomcat-users>
As a kickstart it offers some examples, but as you can see there is not users configured. If we try to modify the file we will see that the changes get lost when the container stops.
In order to persist the changes we can either do a commit of running container, as we will see next, or crate a custom image, we will see later.
Committing the container
If we access to a running container and try to make changes inside it it will be lost when the container is stopped. A way to save those changes is doing a commit creates an image from the current state of the container.
$ docker run -it tomcat /bin/bash
root@7ec07222f200:/usr/local/tomcat# sed -i '/\/tomcat-users/i \
<role rolename="manager-gui"\/> \
<user username="admin" password="admin" roles="manager-gui"\/>' conf/tomcat-users.xml
## FROM ANOTHER TERMINAL
$ docker ps ## My container is named determined_heisenberg
$ docker commit --pause --author "Jose David Martin <j.david.nieto@gmail.com>" --message "Adding admin user to Tomcat" --change 'CMD ["catalina.sh", "run"]' --change 'EXPOSE 8080' determined_heisenberg my_images/tomcat-admin
sha256:0b293a53dd8242a5f4e1d6c4390c34a440e2691707954eee9623429837fa263b
$ docker images
REPOSITORY TAG IMAGE ID CREATED SIZE
my_images/tomcat-admin latest 0b293a53dd82 4 seconds ago 355.4 MB
docker.io/tomcat latest ebb17717bed4 3 days ago 355.4 MB
About the options: author defines who is in charge of the new image. message is a short description about the new image layer. change adds Dockerfile options to create the image.
As can be seen, a custom image is created from the changes on the container but is it actually working? Let’s see.
$ docker run -p 8080:8080 -d --name tomcat_test my_images/tomcat-admin
$ docker ps -a
CONTAINER ID IMAGE COMMAND CREATED STATUS PORTS NAMES
1b06f5463f23 my_images/tomcat-admin "catalina.sh run" 3 minutes ago Up 3 minutes 0.0.0.0:8080->8080/tcp tomcat_test
I am going to access the manager console without been logged:
$ curl -Lv localhost:8080/manager|head
 % Total % Received % Xferd Average Speed Time Time Time Current
 Dload Upload Total Spent Left Speed
 0 0 0 0 0 0 0 0 --:--:-- --:--:-- --:--:-- 0* Trying 127.0.0.1...
* Connected to localhost (127.0.0.1) port 8080 (#0)
> GET /manager HTTP/1.1
> Host: localhost:8080
> User-Agent: curl/7.47.1
> Accept: */*
>
< HTTP/1.1 302 Found
< Server: Apache-Coyote/1.1
< Location: /manager/
< Transfer-Encoding: chunked
< Date: Fri, 04 Nov 2016 10:44:14 GMT
< * Ignoring the response-body { [5 bytes data] 0 0 0 0 0 0 0 0 --:--:-- --:--:-- --:--:-- 0 * Connection #0 to host localhost left intact * Issue another request to this URL: 'http://localhost:8080/manager/' * Found bundle for host localhost: 0x557ed5142220 [can pipeline] * Re-using existing connection! (#0) with host localhost * Connected to localhost (127.0.0.1) port 8080 (#0) > GET /manager/ HTTP/1.1
> Host: localhost:8080
> User-Agent: curl/7.47.1
> Accept: */*
>
< HTTP/1.1 302 Found
< Server: Apache-Coyote/1.1
< Location: /manager/html
< Content-Type: text/html
< Content-Length: 0
< Date: Fri, 04 Nov 2016 10:44:14 GMT
< 0 0 0 0 0 0 0 0 --:--:-- --:--:-- --:--:-- 0 * Connection #0 to host localhost left intact * Issue another request to this URL: 'http://localhost:8080/manager/html' * Found bundle for host localhost: 0x557ed5142220 [can pipeline] * Re-using existing connection! (#0) with host localhost * Connected to localhost (127.0.0.1) port 8080 (#0) > GET /manager/html HTTP/1.1
> Host: localhost:8080
> User-Agent: curl/7.47.1
> Accept: */*
>
< HTTP/1.1 401 Unauthorized
< Server: Apache-Coyote/1.1
< Cache-Control: private
< Expires: Thu, 01 Jan 1970 00:00:00 UTC
< WWW-Authenticate: Basic realm="Tomcat Manager Application"
< Content-Type: text/html;charset=ISO-8859-1
< Content-Length: 2473
< Date: Fri, 04 Nov 2016 10:44:14 GMT
Now logged in:
curl -Lv --user admin:admin localhost:8080/manager|head
 % Total % Received % Xferd Average Speed Time Time Time Current
 Dload Upload Total Spent Left Speed
 0 0 0 0 0 0 0 0 --:--:-- --:--:-- --:--:-- 0* Trying 127.0.0.1...
* Connected to localhost (127.0.0.1) port 8080 (#0)
* Server auth using Basic with user 'admin'
> GET /manager HTTP/1.1
> Host: localhost:8080
> Authorization: Basic YWRtaW46YWRtaW4=
> User-Agent: curl/7.47.1
> Accept: */*
>
< HTTP/1.1 302 Found
< Server: Apache-Coyote/1.1
< Location: /manager/
< Transfer-Encoding: chunked
< Date: Fri, 04 Nov 2016 10:46:00 GMT
< * Ignoring the response-body { [5 bytes data] 0 0 0 0 0 0 0 0 --:--:-- --:--:-- --:--:-- 0 * Connection #0 to host localhost left intact * Issue another request to this URL: 'http://localhost:8080/manager/' * Found bundle for host localhost: 0x56529cc07280 [can pipeline] * Re-using existing connection! (#0) with host localhost * Connected to localhost (127.0.0.1) port 8080 (#0) * Server auth using Basic with user 'admin' > GET /manager/ HTTP/1.1
> Host: localhost:8080
> Authorization: Basic YWRtaW46YWRtaW4=
> User-Agent: curl/7.47.1
> Accept: */*
>
< HTTP/1.1 302 Found
< Server: Apache-Coyote/1.1
< Location: /manager/html
< Content-Type: text/html
< Content-Length: 0
< Date: Fri, 04 Nov 2016 10:46:00 GMT
< 0 0 0 0 0 0 0 0 --:--:-- --:--:-- --:--:-- 0 * Connection #0 to host localhost left intact * Issue another request to this URL: 'http://localhost:8080/manager/html' * Found bundle for host localhost: 0x56529cc07280 [can pipeline] * Re-using existing connection! (#0) with host localhost * Connected to localhost (127.0.0.1) port 8080 (#0) * Server auth using Basic with user 'admin' > GET /manager/html HTTP/1.1
> Host: localhost:8080
> Authorization: Basic YWRtaW46YWRtaW4=
> User-Agent: curl/7.47.1
> Accept: */*
>
< HTTP/1.1 200 OK
< Server: Apache-Coyote/1.1
< Cache-Control: private
< Expires: Thu, 01 Jan 1970 00:00:00 UTC
< Set-Cookie: JSESSIONID=EBB76CFD207E9EA87ABE3E2C3BA9402B; Path=/manager; HttpOnly
< Content-Type: text/html;charset=utf-8
< Transfer-Encoding: chunked
< Date: Fri, 04 Nov 2016 10:46:00 GMT
Dockerfile
Another more recommendable way to create custom images is to use a file that defines how the image should be built. This file is called Dockerfile, and has several instructions to configure the build process. In fact, if we want to add the code of our application this is the way to do it because the base image could not have the necessary tools to get the code such git, wget, curl, etc.
There are several instructions to define inside the Dockerfile, bottom you can see some of them and here you can find the complete reference.
Directives:
- FROM: we define the base image to build our custom one. It could be an image created by us and present in our local repository or we can use one from dockerhub.
- MAINTAINER: the author and maintainer of the image and takes this format “NAME <EMAIL>”
- RUN: defines a command to run in an intermediate container in order to create the final image. It could appears multiple times, but it will create multiple layers that increase the size of the image. It is recommended to define multiple commands in one RUN directive chained with &&
- ADD / COPY: the function is almost the same, add files into the image. ADD is able to get the files from remote servers while COPY can only use files from the host where we are creating the image. The behavior of ADD with compressed files is to decompress inside the image, but COPY copies the file as it is, a compressed one. You can use the one that suits to you.
- ENV: allows to create environment variables for the image. It is based on <KEY> <VALUE>
- EXPOSE: defines the ports that the images expose to outside
- CMD: the command to run when the container starts. The format is [“command”, “argument 1”, “argument 2”, …]. If we specify a command at the end of docker run will replace the one defined by CMD
As an example let’s create an image with access configured to the manager console from the base image but now created with a Dockerfile. This is the project structure:
my_tomcat/
├── Dockerfile
└── files/
 └── tomcat-users.xml

1 directory, 2 files
The tomcat-users.xml file will contains the schema <tomcat-users> but adding the directives to include the admin user, same as we saw when committed the container. This is the Dockerfile:
$ cat my_tomcat/Dockerfile
FROM tomcat
MAINTAINER David Martín david@dmartin.es

COPY files/tomcat-users.xml /usr/local/tomcat/conf/tomcat-users.xml
Next step is to create the image. The docker build command is launched with the name of the image among other options as –rm that will delete intermediate images. The last argument is the path to the directory with the Dockerfile. So:
$ docker build -t new_repo/tomcat-test --rm my_tomcat/
Sending build context to Docker daemon 5.632 kB
Step 1 : FROM tomcat
 ---> ebb17717bed4
Step 2 : MAINTAINER David Martín david@dmartin.es
 ---> Running in bd1f820dd082
 ---> 52507e28c4bd
Removing intermediate container bd1f820dd082
Step 3 : COPY files/tomcat-users.xml /usr/local/tomcat/conf/tomcat-users.xml
 ---> 5cb28500a2f4
Removing intermediate container 389c2dfbd73b
Successfully built 5cb28500a2f4

$ docker images
REPOSITORY TAG IMAGE ID CREATED SIZE
new_repo/tomcat-test latest 5cb28500a2f4 31 seconds ago 355.4 MB
my_images/tomcat-admin latest 3fc1a273c055 2 hours ago 355.4 MB
docker.io/tomcat latest ebb17717bed4 3 days ago 355.4 MB
Now we have two images, the commit one in the repository my_images and the Dockerfile in the repository new_repo.
Our code
The way to add our application code to the container is the same used to enable access to manager console.
Let’s use the latest image created and we will add a JSP page in an application I will call my-app. This is the project’s structure:
$ tree -FAC Docker-tutorial/
Docker-tutorial/
├── Dockerfile
└── my-app/
 └── index.jsp
And the Dockerfile:
cat Docker-tutorial/Dockerfile
FROM new_repo/tomcat-test
MAINTAINER David Martín david@dmartin.es

COPY my-app /usr/local/tomcat/webapps/my-app
Let’s build the image and test it:
$ docker build -t my-app --rm Docker-tutorial
Sending build context to Docker daemon 3.584 kB
Step 1 : FROM new_repo/tomcat-test
 ---> 5cb28500a2f4
Step 2 : MAINTAINER David Martín david@dmartin.es
 ---> Running in f655f489f67a
 ---> 229f530d4aa9
Removing intermediate container f655f489f67a
Step 3 : COPY my-app /usr/local/tomcat/webapps/my-app
 ---> 98ff1813bc26
Removing intermediate container 4d52df8d94c4
Successfully built 98ff1813bc26

$ docker run -d -p 8080:8080 --name my-app my-app
9ad1603e580b25685e9355e49cfca152be8c2eafa95af54d06c94d0651bee959

$ docker ps
CONTAINER ID IMAGE COMMAND CREATED STATUS PORTS NAMES
300e6db90e8c my-app "catalina.sh run" 30 seconds ago Up 28 seconds 0.0.0.0:8080->8080/tcp my-app


$ curl -L localhost:8080/my-app
<html>
<head><title>First JSP</title></head>
<body>


<h2>Well, life goes on ... </h2>


(0.884289073863237)


 <a href="/my-app/">

<h3>Try Again</h3>


</a>
</body>
</html>

$ curl -L localhost:8080/my-app
<html>
<head><title>First JSP</title></head>
<body>


<h2>Well, life goes on ... </h2>


(0.915383534198516)


 <a href="/my-app/">

<h3>Try Again</h3>


</a>
</body>
</html>
It is working as expected. This is the index.jsp file:
$ cat Docker-tutorial/my-app/index.jsp
<html>
<head><title>First JSP</title></head>
<body>
 <% double num = Math.random(); if (num > 0.95) {
 %>


<h2>You'll have a luck day!</h2>


(<%= num %>)

 <% } else { %>


<h2>Well, life goes on ... </h2>


(<%= num %>)

 <% } %>
 <a href="<%= request.getRequestURI() %>">

<h3>Try Again</h3>


</a>
</body>
</html>
Let’s push to the next level…
Using GIT to create our images
Docker offers a public repository where we can upload our images. First you need to be registered in https://hub.docker.com. Once we have our account let’s upload our image new_repo/tomcat-test. But we need to adjust the image name to match our repository in docker, in my case the repository is called dmartin. We will use docker tag.
$ docker tag new_repo/tomcat-test docker.io/dmartin/tomcat-test

$ docker rmi new_repo/tomcat-test
Untagged: new_repo/tomcat-test:latest

$ docker images
REPOSITORY TAG IMAGE ID CREATED SIZE
my-app latest 98ff1813bc26 24 minutes ago 355.4 MB
docker.io/dmartin/tomcat-test latest 5cb28500a2f4 About an hour ago 355.4 MB
my_images/tomcat-admin latest 3fc1a273c055 3 hours ago 355.4 MB
docker.io/tomcat latest ebb17717bed4 3 days ago 355.4 MB
In order to upload the image we need to log in via command line:
$ docker login
Username: dmartin
Password: <my-password>
Email: david@dmartin.es
WARNING: login credentials saved in /home/dmartin/.docker/config.json
Login Succeeded

$ docker push docker.io/dmartin/tomcat-test
The push refers to a repository [docker.io/dmartin/tomcat-test]
cd97edd587f2: Pushed
6d87035edd36: Mounted from library/tomcat
8da55bea02cf: Mounted from library/tomcat
0a4296b74c9b: Mounted from library/tomcat
abdc61dac742: Mounted from library/tomcat
5d330cd8c000: Mounted from library/tomcat
198154638bb4: Mounted from library/tomcat
51d13a3b182e: Mounted from library/tomcat
94601555adaf: Mounted from library/tomcat
0de9d866d419: Mounted from library/tomcat
149636c85012: Mounted from library/tomcat
f96222d75c55: Mounted from library/tomcat
latest: digest: sha256:759a5c11badf9e2696e4cde096bd855cb47bfd9cf363d934b50c843eb6304507 size: 2811
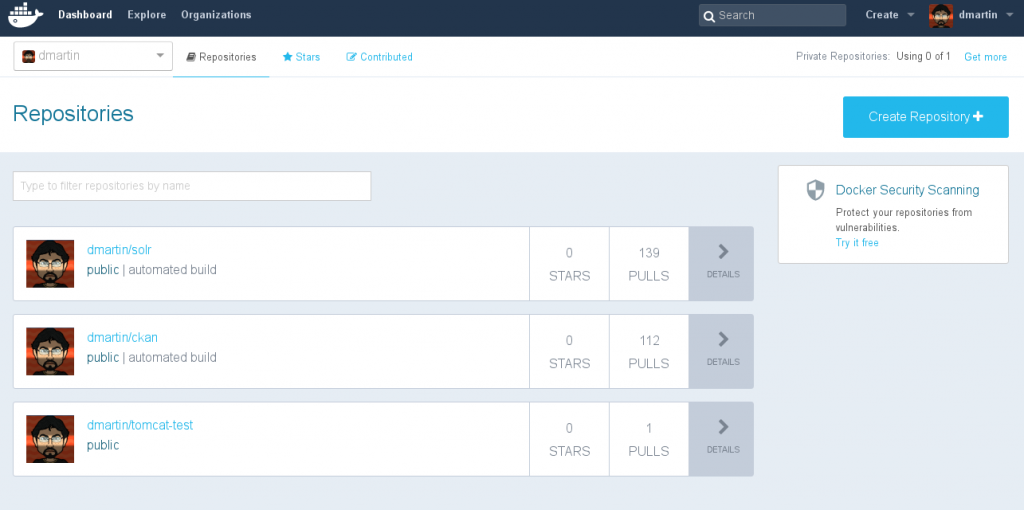
If we connect to dockerhub we can see the image uploaded.

Next step, our git project. If you don’t have account it is a good time to create one.
With github account and our project create, Docker allows us to link a service with github. Once done, every time we push changes to our github repository Docker will build a new image applying the changes.
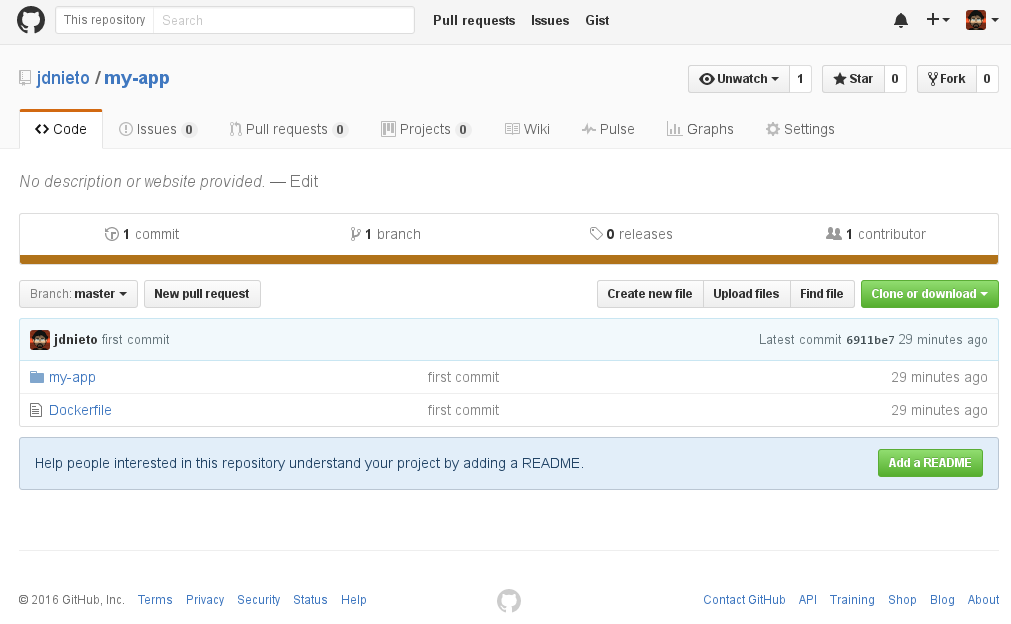
I’m going to use the same project my-app and create the repository on github.

Now in our dockerhub account Docker > Profile > Settings > Linked Accounts & Services we can link with our github account in two ways: Public and Private is the recommended mod that allows to create the triggers to build the image, Limited read only access. I am going to use the recommended one and it will open a tab to authorize github access.
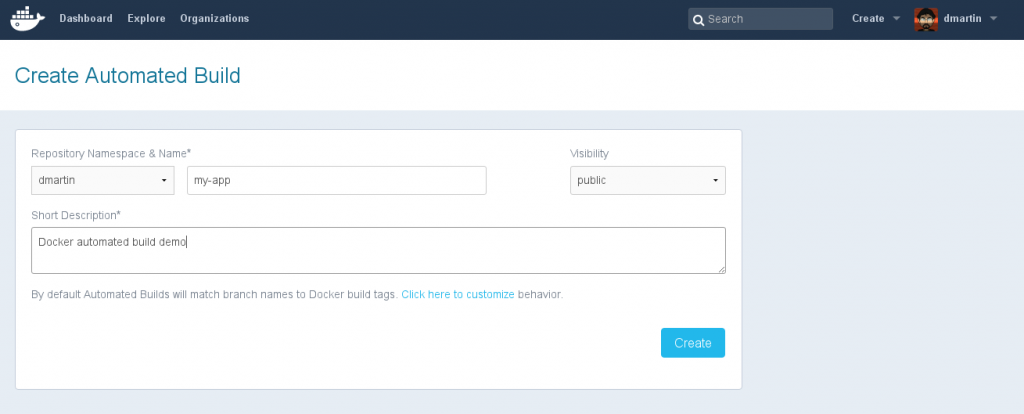
Onc again in dockerhub, on the top right corner, near our profile, there is an access to Create > Automated Build. Once clicked we can chose our github account and after that select the repository and the branch, in my case my-app on the master branch, and also we need to add short description of the automated process.

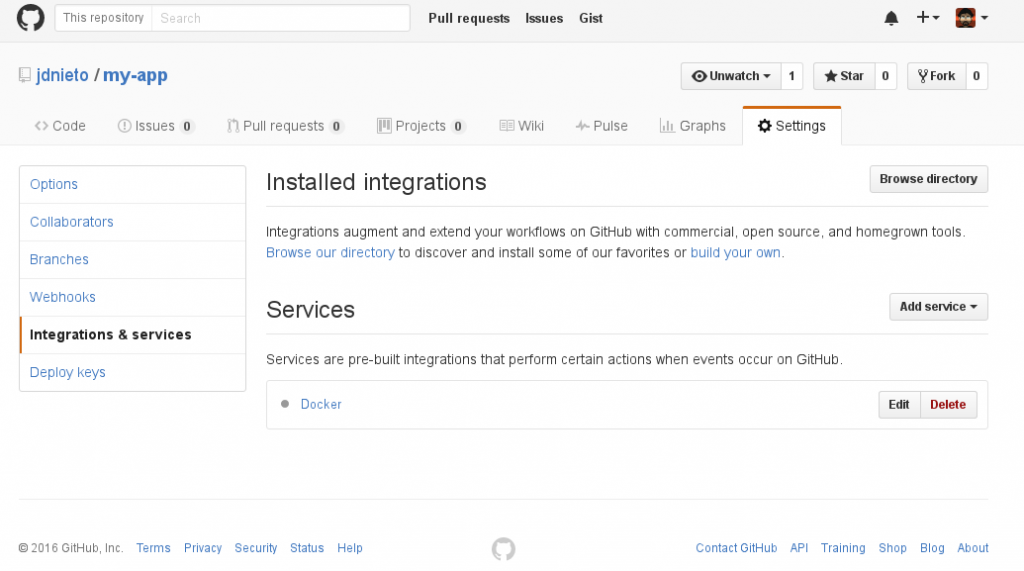
If we go to github > my-app > Settings > Integration & Services we can see the Docker linked service.

It is important to remember that in the root of the project should exists a Dockerfile that will be used by dockerhub to build the image.
Let’s add a new JSP to our project.
$ sed -i 's/new_repo/docker.io\/dmartin/' Dockerfile
$ cat > my-app/date.jsp <<EOF
line -|<%@ page language="java" contentType="text/html; charset=US-ASCII" line -| pageEncoding="US-ASCII"%>
line -|<!DOCTYPE html PUBLIC "-//W3C//DTD HTML 4.01 Transitional//EN" "http://www.w3.org/TR/html4/loose.dtd">
line -|<html>
line -|<head>
line -|<meta http-equiv="Content-Type" content="text/html; charset=US-ASCII">
line -|<title>First JSP</title>
line -|</head>
line -|<%@ page import="java.util.Date" %>
line -|<body>
line -|
<h3>Hi David</h3>

line -|<strong>Current Time is</strong>: <%=new Date() %>
line -|
line -|</body>
line -|</html>
line -|EOF
$ git add Dockerfile my-app/date.jsp
$ git commit -m "added date.jsp to show the date"
$ git push
And wait for the image to be built. It could ocassionally take long time as it is built on the Docker servers, so if there is too many people building images surelly we should wait a few minutes, but after all we will see this:

Is time to use our image, and test the new JSP.
$ docker pull docker.io/dmartin/my-app
Using default tag: latest
Trying to pull repository docker.io/dmartin/my-app ...
latest: Pulling from docker.io/dmartin/my-app

43c265008fae: Already exists
af36d2c7a148: Already exists
2b7b4d10e1c1: Already exists
35dfd23791b5: Already exists
fa0aca12f0dd: Already exists
6e3e424fb5e8: Already exists
3134459e064c: Already exists
3189bffb00a1: Already exists
bac57527e43a: Already exists
3b033f96b6a0: Already exists
088aa8eca2bc: Already exists
91a67baee401: Already exists
13ab5329bd64: Pull complete
Digest: sha256:91960f8626e217bfba3fe903c2b3ff4e43e2c58c779cda4cdfed87acb318b098
Status: Downloaded newer image for docker.io/dmartin/my-app:latest

$ docker run -d -p 8080:8080 --name docker_built docker.io/dmartin/my-app:latest
7e6c2a4be6db3f7e319c24d01285f4171e0d85252a10917b70b3f88965d18d10

$ docker ps
CONTAINER ID IMAGE COMMAND CREATED STATUS PORTS NAMES
7e6c2a4be6db docker.io/dmartin/my-app:latest "catalina.sh run" 5 seconds ago Up 3 seconds 0.0.0.0:8080->8080/tcp docker_built

$ curl -L localhost:8080/my-app/date.jsp

<!DOCTYPE html PUBLIC "-//W3C//DTD HTML 4.01 Transitional//EN" "http://www.w3.org/TR/html4/loose.dtd">
<html>
<head>
<meta http-equiv="Content-Type" content="text/html; charset=US-ASCII">
<title>First JSP</title>
</head>

<body>

<h3>Hi David</h3>

<strong>Current Time is</strong>: Fri Nov 04 15:36:21 UTC 2016

</body>
</html>
This is the end of the Docker introduction tutorial. There are lots of stuff that Docker offers, but I leave you to discover for yourself . See you.
